CroTat – Crochet tatting - Prym
CroTat – Crochet tatting - Prym
CroTat – Crochet tatting - Prym

Create successful ePaper yourself
Turn your PDF publications into a flip-book with our unique Google optimized e-Paper software.
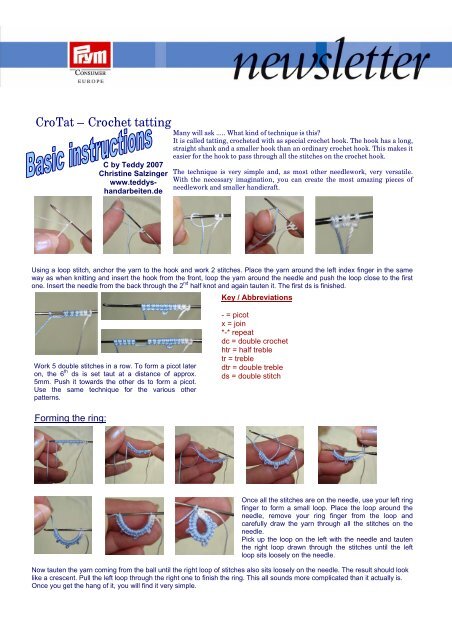
<strong>CroTat</strong> <strong>–</strong> <strong>Crochet</strong> <strong>tatting</strong><br />
Many will ask ..... What kind of technique is this?<br />
It is called <strong>tatting</strong>, crocheted with as special crochet hook. The hook has a long,<br />
straight shank and a smaller hook than an ordinary crochet hook. This makes it<br />
C by Teddy 2007<br />
Christine Salzinger<br />
www.teddyshandarbeiten.de<br />
easier for the hook to pass through all the stitches on the crochet hook.<br />
The technique is very simple and, as most other needlework, very versatile.<br />
With the necessary imagination, you can create the most amazing pieces of<br />
needlework and smaller handicraft.<br />
Using a loop stitch, anchor the yarn to the hook and work 2 stitches. Place the yarn around the left index finger in the same<br />
way as when knitting and insert the hook from the front, loop the yarn around the needle and push the loop close to the first<br />
one. Insert the needle from the back through the 2 nd half knot and again tauten it. The first ds is finished.<br />
Key / Abbreviations<br />
Work 5 double stitches in a row. To form a picot later<br />
on, the 6 th ds is set taut at a distance of approx.<br />
5mm. Push it towards the other ds to form a picot.<br />
Use the same technique for the various other<br />
patterns.<br />
- = picot<br />
x = join<br />
*-* repeat<br />
dc = double crochet<br />
htr = half treble<br />
tr = treble<br />
dtr = double treble<br />
ds = double stitch<br />
Forming the ring:<br />
Once all the stitches are on the needle, use your left ring<br />
finger to form a small loop. Place the loop around the<br />
needle, remove your ring finger from the loop and<br />
carefully draw the yarn through all the stitches on the<br />
needle.<br />
Pick up the loop on the left with the needle and tauten<br />
the right loop drawn through the stitches until the left<br />
loop sits loosely on the needle.<br />
Now tauten the yarn coming from the ball until the right loop of stitches also sits loosely on the needle. The result should look<br />
like a crescent. Pull the left loop through the right one to finish the ring. This all sounds more complicated than it actually is.<br />
Once you get the hang of it, you will find it very simple.
For the next ring work 5 ds. For the last picot of the last ring, pull the yarn through (= join = X),<br />
take up a further 5 ds, 1 picot, 5ds, 1 picot, 5ds.<br />
The stitch description would look like this:<br />
1 st ring: 5 <strong>–</strong> 5 <strong>–</strong> 5 <strong>–</strong> 5<br />
2 nd <strong>–</strong> 5 th ring: 5 x 5 <strong>–</strong> 5 <strong>–</strong> 5<br />
6 th ring: 5 x 5 <strong>–</strong> 5 x 5<br />
Stitch 6 rings for the centre. Join the<br />
last ring with the picot of the first ring,<br />
5ds and close the ring. Finish the<br />
round with a slip stitch in the first ring.<br />
Cut the thread and sew it up.<br />
For the 2 nd round, always crochet 8 chain stitches and join to the rings using a double crochet.<br />
In each chain stitch arch, crochet 1 dc, 1 htr, 2 tr, 2dtr, 2 tr, 1 htr, 1dc.<br />
Cut the thread and sew it up.
*1 st ring: 5-5-5-5, 2 nd +3 rd ring: 5x5-5-5, 10 chain stitches, one ring 5x5-5-5, 10 chain stitches * *-* repeat<br />
In each chain stitch arch of<br />
the previous round crochet 1<br />
dc, 1 htr, 3 tr, 3 dtr, 3 tr, 1 htr,<br />
1 dc.<br />
In the last round, crochet 11<br />
crab stitches per arch.<br />
beginning<br />
crochet together<br />
5 <strong>–</strong> number of<br />
double stitches<br />
crab stitches<br />
1 dc, 1 htr, 2 tr, 2 dtr,<br />
2 tr, 1 htr, 1dc<br />
…..<br />
1 dc, 1 htr, 3 tr, 3 dtr,<br />
3 tr, 1 htr, 1 dc